


This page describes a script that I use for my aerial photography from a kite. However, it can also be used for any other recording medium, such as a balloon or a multicopter.
It is not written by me, the credit for it goes to CHDK forum member waterwingz, who is mainly responsible for it. (I think 😉 ) I merely added photos!
Download Link : KAP & UAV Script Download Link
Forum post : CHDK Forum Thread for KAP_UAV script
Publications :
- v1.1 on 10.10.2013 – first releasev1.2 on 21.11.2013 – minor changes concerning USB mode and focusing in the “infinity” range
- v1.3 on 08.12. 2013 – regulation of the handling of DD filters with cameras without adjustable aperture
- v1.4 on 15.12.32013 – added a minimum Tv setting to limit the slowest shutter speed the script can use. Also added an option to turn the camera off when the desired number of shots is reached.
- v1.5 on 21/12/2013 – changed from set_backlight() to set_lcd_display() to turn off the display.
v1.6 on 25.01.2014 – camera is set to playback mode when USB control is switched on and USB voltage is not applied - v2.2 on 22.03.2014 – added possibility to record a video, more robust and simplified setting for focus to infinity, self detection of ND filter and adjustable aperture, ND filter can be switched on and off
v2.3 on 30.03.2014 – added focus unlock and lock when switching to video mode and back - v2.4 on 19.04.2014 – timing changed to allow more precise shooting intervals
- v3.0 on 30.05.2014 – Added new USB control modes for Intervalometer, Single Recording by Pulse and PWM Input Control Mode
- v3.1 on 14.06.2014 – small change to increase reliability for “focus at infinity” (after zoom is set) and to fix a string error in the Evcomp script parameter
- v3.2 on 27.07.2014 – higher Tv setting possible – useful for aerial photographers who have problems with vibrations
- v3.4 on 19.03.2015 – focus on enendlich simplified, minor bugs and executions fixed, 10 mSec resolution in recording timestamp, USB control modes improved, exit after a specified interval
- v3.4b on 02.05.2015 – Modification: LCD will turn off if user specified start delay when backlight off mode is enabled.
- v3.4c on 03.05.2015 – Reverted the USB PWM timing which uses a 10 mSec precision instead of 1 mSec ( but still uses the high precision timer mode )
- v3.4d on 20.05.2015 – Video interleave mode edited to make it more reliable on older (slower) cameras
- V3.5 on 25.05.2015 – small UI changes ( delayed instead of immediate display shutdown), precise PWM readings now set user changes via script parameter, focus @infinity now tries AFL, MF and then AFt for user changes via script parameter, focus @ infinity now tries for AFL, MF and then AF (AF is used first, but this is slower)
- V3.6 on 06.09.2015 – numerous changes to USB PWM code to allow triggering synchronised to flight controller based on GPS position above ground, added continuous mode of triggering for higher fps, added bracketing.
- V3.7 on 06.02.2016 – added “lens temperature” to the log entry generated for each shot.Die unten stehende Übersetzung bezieht sich noch nicht auf die aktuellste Version. Ich bin bemüht, das schnellstens nachzuholen.
Die unten stehende Übersetzung bezieht sich noch nicht auf die aktuellste Version. Ich bin bemüht, das schnellstens nachzuholen.
Overview
Content
The KAP exposure control script automatically controls shutter speed, aperture, ND filter and ISO settings to achieve the fastest shutter speed needed for kite aerial photography and aerial photography with unmanned vehicles. With these shooting methods, the camera is constantly in motion and the resulting motion blur is the big obstacle to getting sharp shots. Simply setting the shutter speed to a fixed, fast value does not give enough flexibility when lighting conditions change.
This script processes all the relevant inputs with the aim of keeping the shutter speed as fast as possible, but also allows you to lower the speed if necessary to get a proper exposure.
Properties
- user-defined preset for Tv, Sv, Av
- user-defined span for Tv, Sv, Av
- ND filter can be used when brightness is too high
- sophisticated exposure calculations
- all input and output values are given in “real” camera terms and not as APEX 96 values
- Intervalometer
- Start delay
- camera switches off after programme processing
- Exposure compensation
- Set focus to infinity
- Zoom preset
- Display switch-off
- Remote release can be switched on and off via USB signal
- configurable for cameras with adjustable iris aperture and ND filter
- Log-function
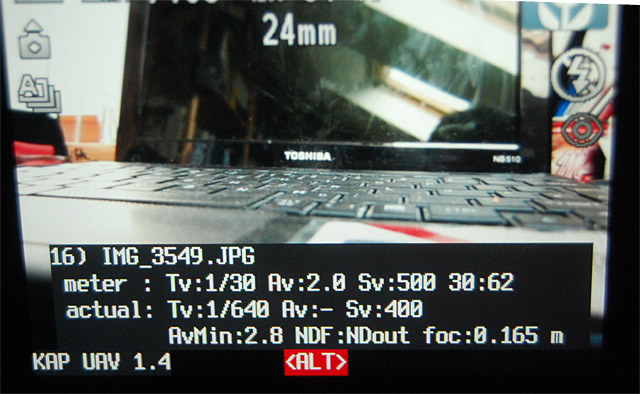
OnScreen Display

Calculation algorithm
For cameras that do not have an ND filter and an adjustable iris (Tv mode only), the script works as follows:
- the script measures the exposure conditions and decides whether the picture can be taken with the default values you set (e.g. Tv =1/1000 second, ISO value between Min (100)and Max2 (800)). If it is possible, the picture is taken with the corresponding ISO value.
- If the shot is too dark with an ISO value at Max 2(800), the shutter speed is increased from the default value in order to obtain a good exposure.
- if the shot is too bright with an ISO value at min(100), the shutter speed is shortened enough to achieve a good shot even if the time is above the maximum default value (of 1/2000 second).
For a camera with an ND filter but without an adjustable iris diaphragm:
- the script performs the TV mode calculation described above
- if the calculated shutter speed is above the maximum default value (1/2000), the ND filter is swung in, the exposure is reduced by 3 f-stops and then the calculation is carried out again
For a camera with an adjustable iris but no ND filter, the script works as follows:
- the script measures the scene and decides whether the picture can be taken well with the preset values (Tv =1/1000 second) and Av =f/4.0, with an ISO somewhere between Min (100) and Max1 (400)). If this is possible, the picture is taken with the corresponding ISO value.
- if the picture becomes too dark with the ISO value at Max1 (400), the aperture is opened to a value that is at the Min setting (2.8)
- If even more light is needed, the script reduces the exposure time beyond the target value in order to get a good shot.
- If the picture is too bright with the ISO value at the Min (100), the shutter speed is shortened to the Max setting (1/2000).
- If the exposure is still too bright, the aperture is increased to the maximum value (f/8.0).
- If the exposure is still too bright, the aperture is closed further than the max setting to get a good shot.
For a camera that has both an adjustable iris and an ND filter, the script works as follows:
- The script pulls back the ND filter and then performs the iris-only measurement as described above.
- if the resulting shutter speed is above the set max value (1/2000), the ND filter is swung in again, the exposure is lowered by 3 f-stops and then the iris-only aperture metering is carried out again
Keep in mind that if you take a photo with very high brightness, the algorithm will result in a shutter speed that is higher than the set Max value, or even higher than the highest possible value that the camera can manage. Under CHDK, such fast shutter speeds may well work, but will not be reflected in the EXIF values for the photo. When this occurs, the log data will reflect the actual values with which the photo was taken.
Also remember that for cameras with iris, if you use the zoom settings to zoom into a scene, the camera’s minimum aperture setting will be increased. The script automatically sets your minimum and target Av values if necessary. This may explain why your EXIF aperture data shows a higher aperture value than your settings require and you are using the zoom.
Set focus to “infinity”
The script offers several methods to automatically focus to “infinity”:
Not all methods will run on every camera, so some experimentation is necessary to find the one method that works for you. Output 2 of this script
automatically selects the best focus method for CHDK versions 1.2.0 or 1.3.0.
Below is a description of the different methods used. But even with this you may have to adapt the script to make it work with your camera.
runs.
None: tells the script not to try to set the focus to infinity.
@shot: tells the script to refocus to infinity before each frame. Some cameras do not require the use of AFL or MF mode.
AFL: puts the camera in Canon AFL mode (automatic focus lock) and sets the focus to infinity.
MF: puts the camera in Canon MF mode (manual focus) and sets the focus to infinity.
Note: when this parameter is selected, the script will show a warning message in red and white on the display if the focus is not set to infinity
is set
Note : if this parameter is selected, the script onscreen log will display a warning message in red & white if the focus does not lock at infinity.
Instructions for use
A loading script is available for cameras with small memory. The loading script loads the kap_uav.lua script into approximately half the memory as if it were to load the
script directly.
The script assumes that the ND filter of the camera is equivalent to 3 f-stops. Change the value of the variable nd96offset in line 93 if this should not be the case.
When the script is running, you can stop it “cleanly” by pressing the MENUE button. Pressing any other button will cause the
display/backlight for about 30 seconds to check the status of the running script. If any button other than the MENUE button is pressed again, the time will increase.
button is pressed again, the time during which the display/backlight remains activated increases.
This script requires CHDK 1.2 (or higher) and build 3149 (or higher).
As always, CHDK is an experiment and although it is quite stable, it is certainly not always perfect. Always use it at your own risk.
Parameter settings
Shot Interval
Determines the time between recordings in seconds
Values: 2 – 120 seconds
Default: 15 seconds
Total Shots
Determines how many shots the script is to take before the camera returns to playback mode.
Values: 1 – 10 000 ( 0 = infinity )
Default: 0 (infinite)
Power off when done?
Causes the camera to switch off when the selected total number is reached. If this menu item is not selected, the camera switches to playback mode when the selected total number is reached.
Default: Off
Exposure Compensation
Works like the built-in exposure compensation and allows the exposure metering to be set up to 2 steps higher.
Values: -2 to +2 exposure jumps ( in 1/3 f-stops).
Default: 0.0
Start Delay Time
Allows a delay of the recording start after the script start to bring the kite or UAV to the desired altitude.
Values: 0 – 10000 seconds
Default: 0
(Tv Min)
Defines the slowest shutter speed to be used. Keep in mind that the algorithm will try not to go below this value in order to get a good shot. This may result in you getting underexposed shots that need to be post-processed.
Used to prevent motion blur when lighting is poor.
Values: none, 1/60 to 1/640 seconds
Default: none
Target Tv
Defines the desired shutter speed – normally a “faster” value of e.g. 1/1000 second is set here.
Values: 1/100 sec to 1/2000 sec
Standard 1/1000 sec
Tv Max
Defines the fastest shutter speed that will be used before the ND filter (if any) is applied. Keep in mind that the algorithm may go beyond this value as a last resort to achieve a good exposure. But this depends on the CHDK capabilities in terms of shutter speeds.
Values: 1/1000 sec to 1/10000 sec
Default: 1/2000 sec
Lowest Av
Defines the lowest aperture value
Values: f1.8 to f8.0
Default: f2.8
only used with cameras with adjustable aperture
Target Av
Defines the target aperture value (sweet spot – the aperture at which a lens achieves its best sharpness and contrast).
Values: f1.8 to f8.0
Default: f4.0
only used with cameras with adjustable aperture
Highest Av
Defines the maximum possible aperture value
Values: f1.8 to f8.0
Default: f8.0
only used with cameras with adjustable aperture
ISO Min
Defines the lowest ISO value that is used.
Values: 80 100 200 400 800 1250 1600
Default: 100
ISO Max1
Defines the maximum ISO value that is used during “normal” photography.
Values: 100 200 400 800 1250 1600
Default: 400
ISO Max2
Defines the ISO value that is used when Max ISO 1 cannot be taken to achieve properly exposed images.
Values: 100 200 400 800 1250 1600
Default: 800
Allow use of ND filter?
Allows/prohibits the script to use the ND filter (if present).
Values: No Yes
Default: Yes
Zoom position
Determines the zoom factor that is set at the beginning of the recording.
Range: Off, 0-100% in 10% steps
Default: Off
Focus Lock
Different modes to set the focus to infinity. Some of these do not work on all cameras, different attempts may be necessary.
Values: Off @Shooting AFL MF
Default: Off
See focus settings above
Video Interleave
If allowed, the script switches to video mode each time after a set number of image captures and records a video.
Values: Off 1 5 10 25 50 100 Shots
Default: Off
Video Duration
Sets the length of the video in seconds when the above item is selected.
Values 5 – 300 seconds
Default: 10
USB Shot Control
Allows the camera’s USB port to be used as a trigger. If there is a 5 volt signal at the USB port, the normal script commands are executed. At 0 volts the script pauses.
Values: Off/On
Default: Off
Backlight Off
Switches off the LCD backlight after 20 seconds of inactivity.
Values: Off/On
Default: On
Logging
Specifies where the log data should be written to.
Values: Off Display SD card Both
Default: Both
Links
link > kap_uav v2.2 loader for cameras with low memory
link > KAP & UAV Exposure Control Script V1
Maybe a few more pictures will follow