


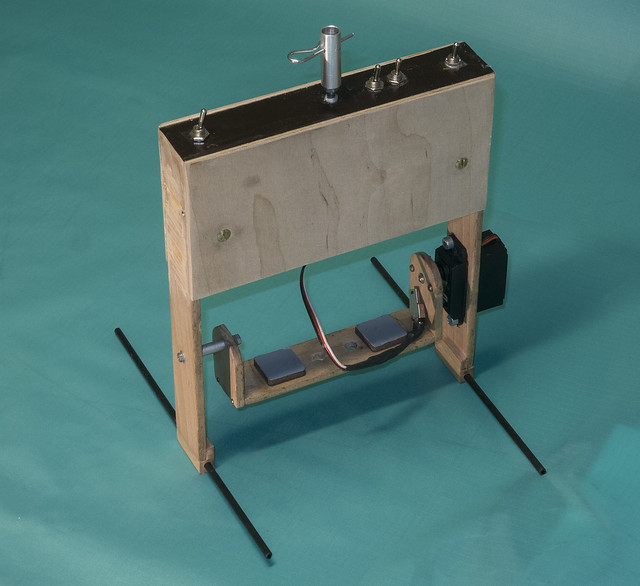
This RIG is a version that, as the name suggests, carries out all movements and triggers automatically.
Well, rather, automatically according to pre-set programmes.
Weight without camera: 395.3 g (+ 11 g for the camera screw)

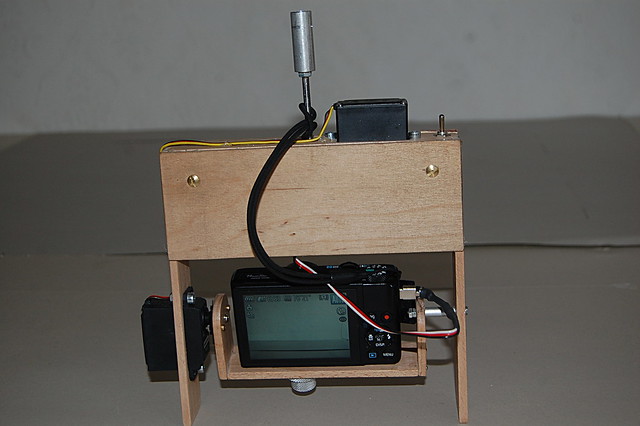
The components
Frame made of 30×5 mm beech wood, glued and pinned together
2 standard servos, one of which has been converted to “endless”.
Camera screw, self-made
Gear wheels Conrad-Modellbau, 20 Z and 40 Z
Drive shaft ø 4 mm, steel
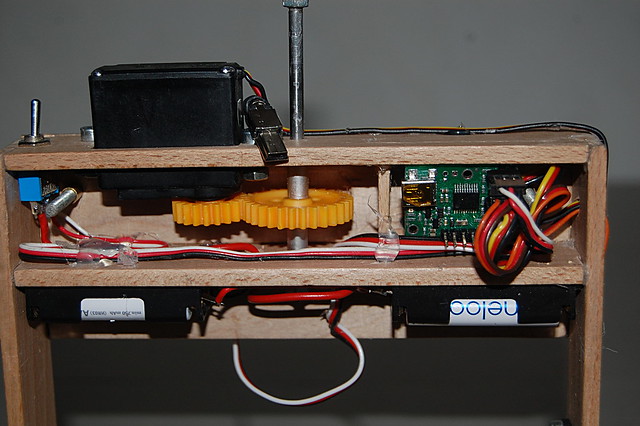
On/Off toggle switch
4x Sanyo Eneloop AA: voltage: 1.2 Volt, capacity: 2000mAh
Pololu Micro Maestro 6-channel USB Servo Controller
USB plug to servo cable, with the signal cable connected to the + wire and the ground cable to the – wire (this is just for me, as I have to constantly look up how I have connected the USB cable to which controller 😉 )
Various screws and spacers
The movement sequence
is controlled by a simple movement programme which is executed on the micro-controller. (I will provide the script on request, but it can easily be created yourself without programming knowledge).
- Programme starts automatically after switching the on/off switch
- Camera moves to starting position, i.e. the camera is tilted slightly downwards so that not too much sky is visible on the image. There is no special alignment in the PAN direction.
- Halfway through the 10-second interval, the controller sends the trigger signal to the camera’s USB port, where the CHDK programme in the camera processes the signal. The description for this you can find here.
- At the end of the 10 second interval, there is a movement of the tilt servo and the camera points downwards at a predetermined angle. After 5 seconds, the command to release is given. After another 5 seconds, there is another change in the TILT angle of attack and the camera points downwards at an even more oblique angle.
- The triggering process repeats.
- 10 seconds after moving to the 3rd position, the camera tilts back to the horizontal starting position and the RIG is rotated by a set angular dimension. Here the described sequence starts again.
- The programme runs until it is terminated by pressing the on/off switch or until the batteries are empty.
In the programme, all desired values can be set, i.e. cycle duration, horizontal and vertical adjustment angle, number of tilt positions.
All that is needed is to connect the controller to the PC with a USB cable so that the new values can be added to the programme. Of course, this cannot be done in the field or on the beach, as it could be done with DIP switches, but any desired value can be entered. With a proven procedure, changes will also not occur so often.
Furthermore, it is planned to add 3 on/off switches and to configure 3 channels of the Maestro Micro controller as inputs. These inputs query the position of the 3 switches and thus offer the possibility of selecting the programme from 8 different movement programmes that provides the most suitable movement sequence for the specific shooting situation.
Let’s see what comes out of this. I will report.
March 2015:
In the meantime, I have extended the rig by one “floor” upwards in order to be able to accommodate the 3 switches, as the space was quite limited in the previous version.

In addition, the servo controller has moved to a different place.
Outside the wooden housing there is now only a cable to the tilt servo and the cable that leads to the camera’s USB port and transmits the release command. Thus I have achieved my actual goal of routing everything that could get caught somewhere or that could be torn off inside.
The weight of the rig without the camera is 446.6 grams and with my Canon S110 (incl. mounting screw) 665.95 grams.
At the moment I have written and tested 3 different movement programmes. There are still small things to change, but everything works as planned.